Silicone joints: what is the best way to install them?
If you’re not a competent DIYer, you can still make a perfectly straight silicone joint.
How to make the perfect silicone joint: a step-by-step guide
To summarize:
The following materials are needed to make a straight silicone joint
As a first step, the substrate must be prepared
As the next step, the earthenware and the worktop must be adhered to the adhesive
The third step is to apply silicone sealant
Afterwards, the silicone joint needs to be smoothed
Step 5 involves removing the protective tape
You will need the following materials to make a silicone joint that is straight
It is an easy level of difficulty
Approximately ten euros are required
It is necessary to have a cartridge gun, scissors, a cutter, soap or dishwashing liquid, and a cartridge of sealing silicone (white or transparent).
The first step is to prepare the substrate
In order to locate the largest gap between the earthenware and the work plan, you must first clean the earthenware and work plan parts and remove residue and fat from them. This will allow you to determine the joint height maximum and, afortiori, where the adhesive will be applied to the vertical wall.
Sticking the adhesive to the earthenware and worktop is the next step
If you’re not quite right, you can minimize the error if you start from the center to the edges. If you are not satisfied, you may want to remove the adhesive. Do not complicate the angle by trying to cut the tape with the cutter, because maintaining a level will be difficult after an angle
The upper part finished, now protect the lower part. Regarding the reservation of wall space, there is no rule. To create a harmonious result, place the lower tape at the same distance from the wall as the upper tape. You can get a more functional result by giving less clearance at the bottom, so that the joint is more vertical, and therefore less prone to splashes and dirt.
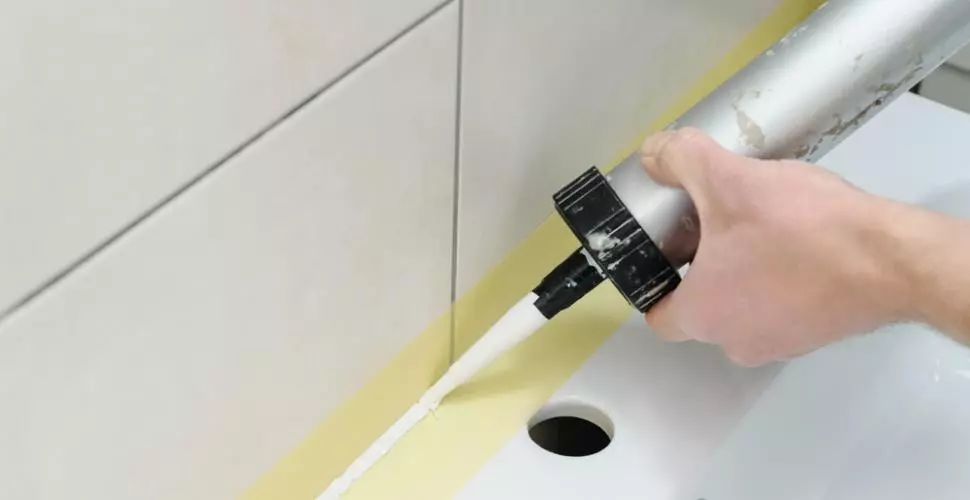
The third step is to apply the silicone sealant
Having prepared everything, it’s now time to apply silicone joints. It is necessary to proceed by lengths, i.e., to take care of each length in order. If you aren’t fast, you shouldn’t try to do it all in one go. Silicone joints don’t dry quickly, but they work within a short period of time before they become less smooth and may even form bulges when rubbed over.
When spreading the joint with your finger, you should have a slight surplus of bead along the entire kerf. Don’t put too much, but not too little either.
The fourth step is to smooth the silicone joint
Press firmly into the groove after moistening your finger with dishwashing liquid, or simply wet it with water or saliva. If it’s missing, add it right away, do not wait, and re-smooth. Wipe off any excess by wiping your finger with a cloth or paper towel.
You should feel the paper rough around your finger’s edges ideally. A possible bead is avoided by removing the tape if there was too much silicone. This indicates that the joint thickness is die on the paper on both sides of your finger. While the bead is not bad by itself, it is quite unsightly.
The protective tape should be removed in step 5
Having finished all the parts, it is time to remove the tape immediately. The ideal way to do this is to use the most open angle possible to avoid damaging the edges of the joint.